
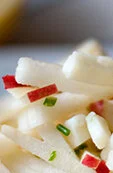

 Today's post is one of my very favorite salads, but it doesn't look like much so you guys have to trust me. Seriously. I have been waiting a while to cart this recipe out because I know it looks boring and tedious, but it is so delicious, and if I had a teenager or child who was trustworthy with knives in the house, I would force them to make this for me at least once a week.I first had this salad at Bar Lurcat, which serves AMAZING food, by the way, so again, trust me. The party we were with ordered this and were gushing about it and I was thinking, "Really? Because it just looks like apples. Why would you order that at a restaurant?" And then I tried it. And WOW.And then I was at a baby shower a while back and the hostess served it! And I stole the recipe. So please make this. And enjoy!
 You'll need some apples (Pink Lady apples work fantastic for this) and a large hunk of Manchego cheese. You'll also need a handful of fresh chives, a dash of olive oil and a dash of salt. Oh! And if you are making this an hour or so ahead of time, squeeze some fresh lemon on the chopped apples to stop them from browning.In terms of proportions, I use one apple for two people and then I try to keep the cheese/apple ratio at a little less than (heavier on the apple) 1:1. So for a party of six, you would want three apples and about as much cheese as you see above (or maybe a touch more). For Jamie and I, I use one apple and about 1/3 of that chunk of cheese. Make sense?
 Now, for the tedious part. You chop the apples into matchstick slices. Like so.
 Next, chop the cheese into matchstick-shaped pieces. It will crumble. That's ok. It is still delicious.Oh! I should also mention that once the cheese is divided, you should put the remaining hunk away in the fridge so that your Vizsla doesn't steal it from the counter because Manchego is her very favorite (just like her mama).
 Mix the apple and cheese slices in a medium bowl and then hold the chives over the bowl and use your kitchen scissors to cut the chives into the bowl. The amount of chives is really up to you -- I love garlic and onions, so I do about as much as you see here -- but you could do less.After adding the chives, add in 1-2 tbsp olive oil and salt to taste and toss.
 Voila! Sooo delicious. I wish I could tell you how it holds up for leftovers. But I never have any.This is about 360 calories a serving. AND WORTH IT. You can also use a bit less cheese to take the calories down, but good lord be careful about that. Manchego is a gift from the Gods, people.For your internet share today, how about a link to this bacon and pea pizza? It's kinda like that pasta I made a few weeks back, but, um, PIZZA YUM. Enjoy!


 Today, I thought we'd do omelettes because a) it's Easter and everyone loves a good breakfast today and b) because I particularly love any kind of breakfast for dinner.First, I must be honest and tell you that I make a great omelette only about 50 percent of the time (often mine turns into a very fancy scrambled egg). My man Jamie, however, makes a fantastic omelette every single time he tries, so this is really all about his tips and pointers. As well as his fabulous hand modeling. So! Let's get started.
 First, what you'll need:What is required:• Three eggs (per large omelette -- we make a big one and share it with a side salad, if that helps you judge the size)• 1 Tbps butter• Salt and pepper to tasteOptional ingredients:• Chives• Cherry tomatoes• Mushrooms• Cheese of your choice• Sour cream• Anything else you like in your omelette. Sometimes I have leftover carmelized onions, and those are fantastic! Or bacon! Or peppers!
 Now, I'm not gonna lie. A huge part of making our omelettes is our pan. It's a small pan with no hard corners (a smooth oval shape inside). My mom sent this to us one year (I am 99 percent sure it's an estate-sale find) but I've seen great non-stick options at TJ Maxx or Marshalls (my own mecca of kitchen supplies).
 The first thing you want to do is chop up your optional ingredients. You really don't need a lot here -- I think we used 2 cherry tomatoes and about 2 tablespoons chives and maybe one mushroom. Also! This is when you begin heating your pan on very low heat (VERY LOW) and melt your butter. Make sure to spread it all over the bottom and the sides.
 Next, crack your eggs and scramble them up.
 Then pour them into the delicious melted butter in the pan. Mmmmm.... (See how low that heat is? LOW.)
 Now this is the part that requires a bunch of patience that I don't really have and that my husband is the master of. While the egg is slowly cooking, you test the edges with a fork. When you find solid edges beginning to form, you slowly and gently lift them, and then tilt the pan so the uncooked egg seeps underneath your cooked edge. You do this on all sides of the omelette.
 You can kind of see here the edges that were pulled up and where the egg slid under. Don't worry how it looks, this will cook the most evenly. Also, once this is done, add your seasoning.
 Once the egg is starting to set (jiggle the pan and see if the liquid slides all around or if it's starting to congeal -- maybe 3-5 minutes) then you add your optional ingredients to half of the omelette, like so.
 Ours up there is now covered in cheese, as all things should be. Next you take your fork and work around the edges to make sure the omelette is separating from the pan, and gently using two forks, flip the side with nothing on it over the side with the filling.
 Like so. Also, using two forks is helpful here.
 Let this cook for another minute, then using both forks, flip the omelette over. This is tricky business, but I'm confident you can do it.
 Voila! Now you let it cook on this side for another minute or two.
 And there you go! We slide the omelette onto a plate straight from the pan (no lifting it up! it will break!), trim off the weird edges for the dogs and then garnish with a little sour cream, chives and fresh tomato. Delish!For this entire omelette, it would be 481 calories. But that would be SUPER filling, so as I said, we often split it and share some fruit or salad on the side. Enjoy!Your internet share today is
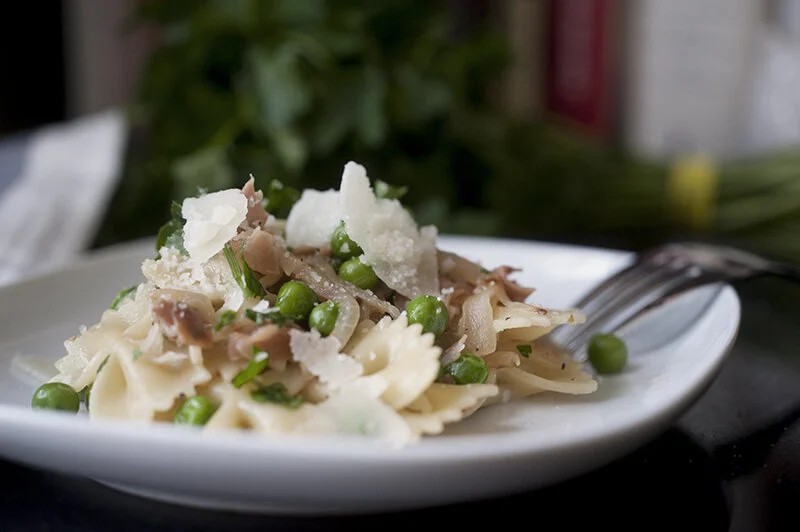

 Today's dish is one of our very favorites. We got this recipe from William Sonoma, and we've been making it consistently for more than a decade. We have only had it a few times in the last few years because of my giving up pasta for the Paleo diet, but it's still what Jamie requests on special occasions. So I guess what I'm trying to say is, this is damn tasty. In fact, the first time we made this, I was doubtful of how good it would be, and I remember covering it with salt thinking that would make it better (before I had even tried it). But really! It's fantastic.
 So here we go! You'll need:• 2 tbsp olive oil• 1 large, yellow onion halved and thinly sliced• 1 package (10 oz) frozen peas• 1/2 cup water• salt and ground pepper to taste• 1/2 lb farfalle (half of a box)• 2 oz prosciutto, minced• 3 tbsp Italian parsley• 2 tbsp butter• parmesan cheese to taste
 First, slice the onion, heat the olive oil and begin cooking the onions until they soften. This takes about 15 minutes, which provides time for the next steps! Oh! You should also start heating the water to a boil for the pasta now as well.
 While the water is heating and the onions are cooking, mince your prosciutto, measure your water etc. Prep work.
 Once the onions are done, add in the frozen peas and the water. You want to cook these until the peas thaw (about 5 minutes). This is also when you should season with salt and pepper to taste. Once the peas are thawed, remove this pan from the heat.
 About this time, the water is boiling and you can add in your pasta. You want to follow the package instructions and cook until al dente.
 When there's about 5 minutes left on your pasta, add in the prosciutto and parsley to the pea mix and reheat the mixture on low heat.
 Once the pasta is done, drain it and add in the butter (to the pasta pan). Once the butter has melted all over your delicious pasta and everything is coated nicely, then add this into the larger pan with the peas/prosciutto mix. Toss the ingredients until everything is mixed in, then distribute among your guests (or yourself).
 Generously sprinkle parmesan cheese over the top and maybe a bit more parsley and voila! You are done. Enjoy!
 This dish has 552 calories per serving (and serves 4-6). It's a bit of a splurge, but it's so good in the spring... Oh! And if you have access to fresh peas, you can use those instead...For my internet share today I'm sending you to
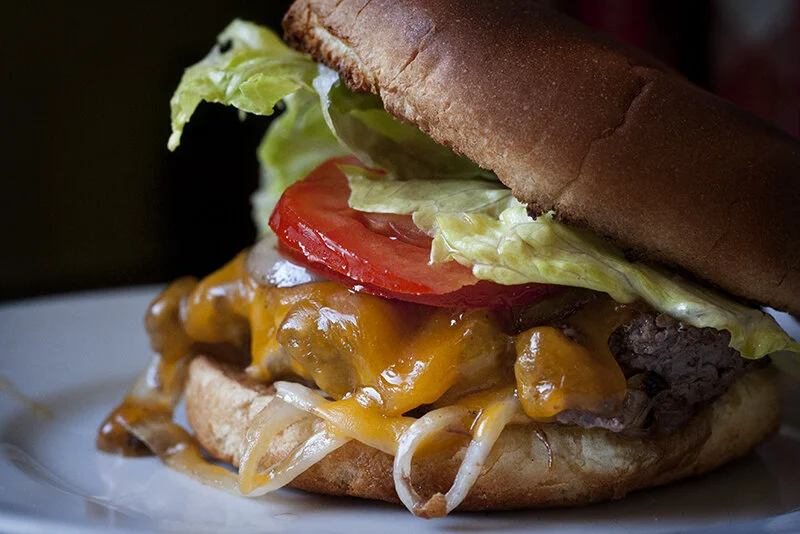

 It's supposed to get to SIXTY ONE DEGREES in Minneapolis today! So let's celebrate with greasy cheeseburgers, shall we?!? First off, I hate to disappoint, but these are not made on the grill. I just can't seem to get consistent results when cooking on a grill, so I still make mine indoors. But! I can still EAT it outdoors, eh?Second, I should tell you that I think these burgers taste WAY BETTER without the lettuce and tomato and with nothing but pickle on 'em. But, I'm not gonna lie, that photo wouldn't be as pretty. And we all know where my priorities lie... So build the burger the way you like, but at least TRY it without all the condiments, ok?
 Ok! Let's begin. You'll need:• Ground beef. Mine are about 1/5 lb big (so I get 5-6 burgers per package of meat)• Vidalia onions. You want the sweet ones. And you want them sliced so thin you can see through them.• Butter (duh). About 1-2 tbsp• Buns! Do not get the plain kind. Get "potato sandwich rolls" or "onion buns." It makes a big difference.• Condiments. As I said, I like just pickles. But add what you like.• Salt• Garlic salt
 First off, slice those onions and slice them as thin as you possibly can -- I try to make them transparent.
 While slicing the onions, melt the butter in your frying pan. Then use an ice-cream scoop to scoop the meat into a clump on your pan. This seems weird, but it's a good method and your hands stay clean.
 Generously sprinkle salt and garlic salt onto the meat ball.
 Sprinkle a large amount of the onions on top of the ball. Try to balance a lot on the ball, but it's ok if some fall to the side.
 Then, take a spatula and smoosh it all down into a burger patty like so. This way the onions are pushed into the meat where they will cook and make things tasty.
 Like so. Cook this first side about 3 minutes or less. I usually wait for the "meat juice" to begin to collect on the top of the burger, but this only happens about 60% of the time, so I just eyeball it.
 While that's cooking, toast your buns. You want to do this so the juice doesn't make your bun soggy.
 When ready, flip the burger. Let it cook for 1 minute, and then add your cheese on top. Next, take a lid or bowl or metal pot (see my ghetto solution above) and put it over the burger for another minute or so to get the cheese all gooey.
 Serve up the meat on your bun and spoon on the extra onions that you cooked. Mmmmmm.....
 And there you go! Delicious burgers! Nom nom nom.These burgers are about 530 calories. Sorry folks, but I think it's better to know just how bad they are (and yet, SO GOOD).For your internet share of the day, I'm sending you to

 I was thinking of doing a fresh, vegetable dip for today's post, but then it snowed a few inches last night and the fleeting summer feeling escaped me, so I thought we'd snuggle back into some comfort food while it's still chilly. Also! I'm doing dips because it's March Madness! One of the best times of the year! Where you, too, can watch all the college basketball your heart desires (while snacking) and root for the Kansas Jayhawks to win it all (against all odds!). And if they lose, then you can drown your sorrows in comforting, creamy salmon dip. How's that for problem solving?
 First off, here's what you'll need. You should note that I tried to make it this week with "lox" style smoked salmon, and I would not suggest that. It still tasted good, but I prefer buying actual smoked salmon -- you know, the kind you can flake into small pieces and it blends better into the dip. My grocer was all out of that kind, and since I had walked to the store, I didn't have the time (or energy) to walk another mile and back to see if the next store did have the proper kind. Like I said, this works in a pinch, but the flaky, smoked salmon fillets work better.Oh! And I also should mention that you may use canned salmon. That's actually what this recipe (handed down from my wonderful mother) calls for. I did that once and the contents of that can are still haunting me (what is all that hard stuff? why is it black? THIS IS NOT WHAT FISH SHOULD LOOK LIKE!), so I prefer to use the "real" kind instead of canned. But it's up to you. Oh! And one more note! My mom throws in 1/4 tsp liquid smoke. I'm sure it makes it taste even more divine, but I cannot figure out what is exactly in liquid smoke except for chemicals, so I leave it out. I'm paranoid like that.OK! Let's get to it!• Either 1 lb smoked salmon (canned or from your butcher shop) OR 8 oz of the lox-style salmon• 8 oz of soft cream cheese (the block kind works perfect)• Juice from 1/2 of a lemon• One very small shallot grated (and have kleenex nearby -- grating onions produces major waterworks). You can also use 2 tbsp grated regular onion.• 1 tsp horseradish sauce• 1/4 tsp salt• 1/2 cup chopped pecans• 3 tbsp fresh, chopped parsley• dash of Worcester sauce
 Start by mushing up the cream cheese to make sure it's soft and pliable, then add in the salmon. Again! This is super easy when it's from a fillet. A bit challenging when it's the lox-style.
 Next, mix in your lemon juice, horseradish sauce, Worcester sauce, salt and grated onion. Now, once it's all mixed, I think letting it sit a few hours in the fridge does wonders for the flavor, but it's not mandatory. Also, if my mom were making this for you, those fingernails would be freshly manicured. Um, sorry.
 Lastly, I mix it up in small serving bowls and mix in the pecans and parsley. Now! If you are feeling retro and kitschy, my mom makes this into a ball served with a delicate little knife. She rolls the ball in the pecans and parsley, which is lovely. After Magda jumped on the table and ate my cheese ball last fall, I prefer bowls that cannot be gulped down in several gross swallows (resulting in trips to the emergency vet). But that might just be me.
 Also! This goes great with any kind of cracker. I, personally, love the Nut Thins by Diamond that are made of pecans. But those yummy butter crackers work well, too!And this is about 217 calories if split between 8 people (and that doesn't count the crackers). The good news is that it's so rich, you can skip dinner! Oh, and I should also mention that it's great on warm bagels in the morning as well.For your internet share, I'm sending you to another recipe that would be a huge hit if you were to bring it to my house to watch basketball. In case you haven't picked up on it, baking scares the crap out of me. So YOU should make ME
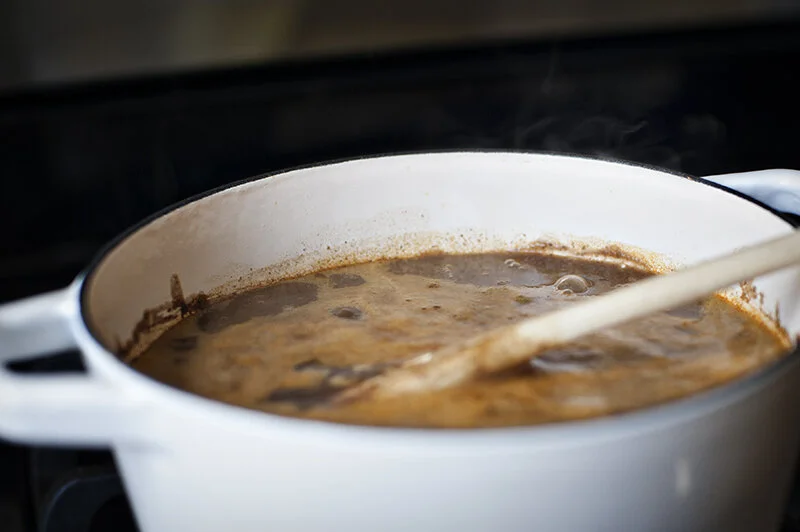

 Today's recipes is one of my old standbys that I've been making for years because a) it is super fast b) it is super easy and c) everyone seems to love it. My mom passed it on to us many years ago, and it has never gotten old.
 First, you'll need:• 3 cans of black beans. I use Kuner's with cumin and spices -- that brand/kind makes a huge, huge difference.• 3 cups chicken broth• 1 medium onion, diced• 3 cloves garlic, minced• 3 tbsp olive oil• 1 tsp dried oregeno• 1/2 tsp dried thyme• 1/2 tsp ground cumin (make this heaping, I always add a little extra)• 1/4 tsp cayenne pepper• optional for garnish: diced tomatoes, fresh chives, sour cream
 While you heat the olive oil in the soup pot, dice the onion and garlic. Also! Remember my match trick. Hold an unlit match between your teeth to avoid the tears.
 Add this mixture to the warmed olive oil and cook for about 5 minutes or until soft.
 While that's cooking, measure out your spices. You add these after the onions are soft and let it cook for one minute. Cooking the spices in with the browning onions is a good way to increase the flavor.
 Next, add in 2 cans of the black beans (semi-drained).
 And then mash them with your potato masher. This infuses the beans with that yummy oniony/spicey mix. DELISH.
 After it's all mashed together, add the last can of drained beans and the 3 cups of broth. Bring to a boil and simmer for 20-30 minutes.
 SEE? I told you this was simple! And so dang delicious! For a cup of soup like you see above, it's 168 calories (and pretty filling for a small lunch). For a bigger bowl (for dinner maybe), it's about 240 calories. And the garnishes add about 23 calories per bowl.For your internet share, I'm sending you to

 Good morning! For today's Savory Sunday post, I decided on breakfast tacos because a) many, many, many of my friends are likely a touch hung over after the Arcade Fire show last night, b) they are a bit of a shout-out to those of us not making it down to Texas for SXSW but who still like tacos and c) you can have them for breakfast, lunch or dinner! They are among my very favorites, and I usually have all of the ingredients on hand so it's a fantastic last-minute brunch idea.
 So, let's get started. First, you'll need these ingredients for four tacos:• four flour tortillas (I like the smaller ones)• four eggs• handful of fresh cilantro• one avocado• 2 tbs butter• 2 tbs olive oil• your favorite salsa
 Begin by heating the olive oil and once hot, browning the tortillas. I get them about like above, flip them and then set them on paper towels to drain while you do the rest.
 This is what they look like finished. I am here to tell you that browning these tortillas is the secret ingredient to all the best tacos in the world. I promise.
 After the tortillas are brown, you want to scramble your eggs. People! I make the best scrambled eggs in the universe. I know this dish doesn't seem hard, but follow these instructions and you will have the fluffiest, most delicious eggs ever. I promise.
 Scramble the eggs in a bowl. Just the eggs. No milk, no water, nada. While doing this, melt the butter in a sauce pan. NOT A FRYING PAN. Trust me.
 Go get your baking spatula (as seen above) and stir in the eggs with the melted butter over medium-low heat. Keep stirring. Do not stop stirring. They will start to thicken like this.
 When you think they are almost done but maybe just need "a few seconds more" take them off the heat. Your eggs will continue to cook even off the heat and this will make them perfect. I promise. This is also the best time to add salt and pepper to taste to them.
 Now that your eggs are finished, mash up one avocado with a fork and then spread it over a tortilla like so.
 Add in the eggs, your favorite salsa and a bit of fresh cilantro and you are done! SO TASTY AND PRETTY.
 Each taco is about 368 calories. But be careful, I could eat about seven of these things.And for your internet share of the day, how about I send you to a home-made recipe for nacho cheese Doritos! I'm sure these are good, but they seem like too much work for me. I think I'd rather just buy a bag. But if you're worried about the ingredients,
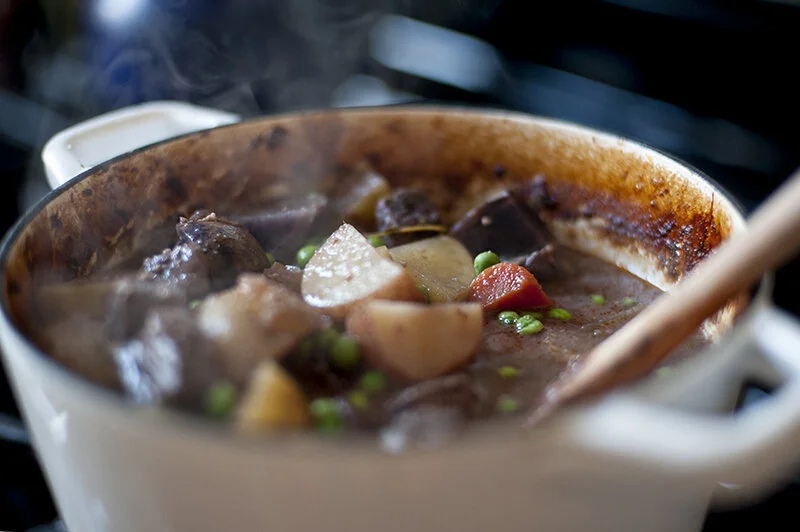
 Yum, right? That's my beef stew and I looooooooove making this in the winter. And since we are currently living through the most hellish winter of my lifetime, I thought I should share the recipe with you. We all need something happy right about now, eh?
 First off, here's what you need:• Delicious red wine (2 cups of it)• 1.5 -2 lbs steak/roast cut up for stew (or you can have the butcher cut it)• 4 carrots. Oh hell, I always wish I had more carrots in this. Better make it six.• 1 large onion, diced• 2 cloves garlic, minced• 2 bay leaves• a few sprigs of fresh thyme• 2 cups chicken broth• 1 cup frozen peas• 1 tbsp tomato paste (oh hey, if you forget to buy tomato paste -- not that I've ever done that per se -- you can boil down tomato sauce for about 20-30 minutes and voila, you get a tomato paste.• 2 tbsp olive oil• 1 lb small potatoes• 1/3 cup flour/gluten-free flour/cashew or almond meal/whatever you use to thicken stuff up a bit
 Now it's time to get cookin! In a dutch oven (or a large pot that can both go stovetop and inside the oven) warm the olive oil on high heat. While it's heating, rinse and pat dry your beef, then add it in small batches, browning on all sides. Once the meat is browned, move to a plate with paper towels to drain the fat while you continue browning the rest of the beef.
 Once all the beef is browned, throw it back into the pot and add in the carrots and onion and cook on medium heat until the onions begin to get soft. Once this happens, stir in the tomato-paste mixture and let that cook / mix in. After about a minute or two, add the flour in slowly to soak up all the juices.
 Now slowly add in the 2 cups of wine, and let that cook on med-high for about 3-4 minutes. This is the point when your husband/child/dog will wander into the kitchen wondering what in the world smells so divine. After the wine has cooked down a little, add in the chicken broth and the thyme and bay leaves. Stir it all together, put a lid on it, and put it in the oven to cook for 1 hour 20 minutes.
 While it's cooking, I usually take this moment to clean up the kitchen.
 When you have about 10 minutes left on the timer, wash your potatoes and quarter them.
 I got these blue potatoes at Trader Joe's -- aren't they lovely? I love that color! I have always read that food that is intensely colored has more nutritious value, so I happily try different variations of potatoes, carrots etc.Anyway! Once the timer goes off, bring the stew out of the oven and remove the bay leaves and the stems from the thyme, and toss in the potatoes. You can also skim off some of the fat if you like. Then put it back in the oven for another 20 minutes.
 Now, this is one of those dishes that is the most pretty on the first day, but tastes the best each day after. So what I like to do is make it in the morning/early afternoon, and then put it away and reheat it for dinner. The longer the flavors are together the better it gets. Enjoy!Oh! And the calories :) This is about 446 per bowl (if you get six servings from the batch). That might seem like a lot, but you'll be stuffed all night so I think it's totally worth it.And for your internet share of the day, I found this post on