NOTE FROM LESLIE: Hey guys! While I'm out snuggling this newborn (and cleaning up poop and vomit) (and trying to sleep) (and trying to keep sane), I have recruited several of my very favorite bloggers to share their recipes on Shuttersmack so I can relax for a few weeks without cooking. I *highly* encourage you to check out their blogs as well -- I chose them because I love their cooking style and I love their photography. Win-win! Today's post is from the wonderful Louisa at louisapodlich.com. Louisa is one of my favorite photographers in town who happens to cook. I twisted her arm into doing a good carb recipe for me, since I don't bake or eat many carbs (and the rest of you might!) Enjoy! Well hello all of you good looking blog people! My darling friend Leslie just had her baby, so she asked me to step in and do a guest blog post for her. I was, of course, delighted to be asked, until I realized just how TERRIBLE I would be at taking photos of food. Leslie is basically a champion at this sort of thing, so my photos are going to look a little ridiculous in comparison, but I guarantee you that if you follow along with my recipe, you'll get amazing results.This past winter was, as most of you know, long, cold and miserable. I decided to try to make the best of it by learning to make my own carbohydrate-rich food items...specifically bread and pasta. If you haven't made these yet, get on it. You'll never want to go back to the store-bought kind. Today's post is all about pasta. It's pretty much the easiest thing you can make, and the most rewarding. This recipe is as basic as it gets and all you need is a few ingredients, a mixing bowl and a pasta roller (which you can find online for about $30).
 To get started, get your ingredients ready. You ingredients are: eggs, semolina and all purpose flour. That's really it, can you even believe it?
 Now, on the day I shot this post, I was making a double batch of pasta because we were having company, so just follow the recipe below to make a single batch.
- 2 large eggs
- 1 cup flour
- 1/2 cup semolina
Here's the thing about pasta dough: it's all up to your tastes. I've made pasta with just eggs and all purpose flour, and I've made it with just eggs and semolina. I prefer to mix some ratio of flour and semolina together to make the pasta the right consistency, but if you don't have the right stuff in your cupboard, you can definitely get a little creative.First, dump the semolina and flour into your mixing bowl and stir the two together.
 After the two have been blended, make a well in the flour mixture with your hand.
 Mix your eggs with a fork.
 Once your eggs are mixed, pour the egg mixture into the well in the flour mixture SLOWLY. Once it's all in there, make sure your hands are nice and clean, and then just get in there and start adding the flour mixture into the egg mixture. Please note that this is a job for both hands, but I had to hold the pesky camera. In the future, I will definitely hire a professional to come shoot my pasta making process.
 As you squeeze and squish the dough, two things will happen: 1. Your hands will get really gross and caked with an eggy flour mixture that is, honestly, kind of a pain in the butt to wash off. 2. Your mixture will become crumbly and you'll have a hard time keeping it together. At this point, you'll want to just dump the bowl onto your (clean) counter and start mixing again right on the hard surface.
 At this point, you may find that your mixture feels really, super, mega dry. You have wo choices here: you can either add a little bit of warm water to the mixture, like, 1 teaspoon at at time, or you can stop trying to get all of the flour to mix with two eggs, and just let some of the loose mixture not make its way into the dough. I tend to go with the latter option, but if this is your first time making pasta, you might want to add the water. Just remember to add it slowly, or your dough will get sticky and you'll need to add more flour. This can turn into a vicious cycle.As you continue kneading the dough, it will start to feel less crumbly, and more smooth. Keep going.
 After about 10 minutes of continual kneading, you should be able to form your pasta dough into a ball.
 Once your ball is formed, hold it in your hand and make a cut about half way through it with a paring knife. If you see lots of air bubbles, knead for a few more minutes and then make another cut. You want the dough to feel pretty smooth and look fairly solid on the inside. Air bubbles are not great in pasta, so take the extra minute to knead them out.
 When you finally have dough that is mostly free of air bubbles, form a ball and wrap that sucker in cling wrap. Let it sit on the counter for 30 minutes and go do something fun.The 30 minutes are up! Huzzah! Now comes the fun part! (I would like to point out that at this point in the process I had to employ a friend to help me shoot the images in my dark and unattractive kitchen, so they get even less awesome, but YOU GET THE IDEA. In my next life, my kitchen will be all white, full of windows, and perpetually spotless).Clamp your pasta roller to your counter, and unwrap your dough. Cut it into 4 pieces and remove one piece. Wrap the other 3 pieces up again so that they don't dry out.
 Set your pasta roller on the HIGHEST number you can before you start rolling. You want to get that fat ball of pasta dough to go from fat to thin, but you have to do it gradually. Use one hand to feed the dough ball though the rollers, while using the other hand to slowly turn the crank. Once the dough is through at the top, use that hand (probably your left hand) to catch the sheet of dough as it comes through the rollers, transformed into an awesome silky sheet.
 Once the sheet has come through the roller, lay it flat on the counter and fold it into thirds, and put it through the same roller setting again. After you've done this, move the setting to the next lowest number and repeat, over and over again, until the dough is at a thickness you like.
 If your dough sheet gets too long, it's okay to cut it in half and just have shorter pasta. It might take a few times of making this recipe to figure out the sweet spot.Once the dough is where you want it to be in terms of thickness, move the crank to the cutting rollers! Lift the dough up nice and high and place just the end into the rollers, and start cranking SLOWLY. Once your sheet is about 2/3 of the way through, use your left hand to catch the pasta strands as they come out. This step is definitely easier if you have another person around to help you: that way, one person can turn the crank, and you can use your right hand to feed the dough into the roller and your left hand to catch the pasta as it comes out.
 Once you've grabbed the pasta, lay it out on a kitchen towel so that the pieces don't overlap. They will absolutely stick together if you lump them on the counter all willy nilly, so take a moment to do this step correctly. At this point, you should also get a large pot of water boiling so that you're ready to cook the pasta when you're doing cutting it.
 As soon as you finish the first quarter of dough, start all over again and do pieces 2, 3 and 4. Remember to put your roller setting back on the highest number at the beginning of each piece so that your pasta is consistent.
 When all of your pasta is done, put the noodles into boiling water for 3-4 minutes (longer for thicker pasta, shorter for thinner). When the pasta is done cooking, strain and rinse it and then toss it with your favorite sauce.I'll be honest with you, I had hoped to get an amazing sauce made for this post, but it just didn't come together, so you'll just have to invent one of your own (or raid the internet) and come back for my next guest post!Good luck with your carbs and let me know how it goes :)


 A few mornings ago, I got up to feed Ezra in his room. When I stumbled back to bed, this was what I found. Replaced so soon!But in all seriousness, we are trying to keep things as normal as we can with Magda now that Ezra's in the picture, and that includes bedtime snuggles.She seems to be handling the change pretty well. If anything, she just needs more exercise (which, sadly, I can't give her until I heal up). But overall, she's been fantastic. Just a few pacifiers destroyed here and there. And I suppose that's to be expected. The good news is that she cannot for the life of her figure out the diaper pail (SCORE!).


 Ah, remember back when my nightstand was full of journals and novels and such? My, how things change.This infection is requiring quite the medicinal arsenal. I'll be so happy when I'm medication-free again.

 Oh you guys, you guys blow me away. I have had *so* much help and good wishes and such since I got home from the hospital. Loads of gorgeous flowers (those up there are from the wonderful people at

 What a week! Sorry I couldn't get back to you sooner. I got an infection while in the hospital and then yesterday my incision got infected as well, resulting in Ezra's first field trip... back to the hospital with me to see a doctor. Man, he is gonna freak out when we actually get him out somewhere FUN.But because of said infections and resulting fevers and such, my blogging was put on the back burner. However, I have still been taking photos along the way so I can remember this time. I should warn you that while I do photoshop my clients' photos to remove infant skin issues (flaking, acne, etc etc) I don't want to do that with Ezra because I want to remember these days exactly as they were. So if you didn't know, babies lose a ton of skin in their first few days, and then later they get crazy acne. It's normal, it's just that it's normally photoshopped away.Also, because of my recovery, I'm not supposed to climb stairs which means I'm confined to the upstairs of our house for the first week or two. So if these images seem a touch repetitive, know that my "locations" are limited. OK! Enough excuses!Don't you love that image of Jamie holding Ezra up there? Yeah. What a coupla hotties.
 I snapped this on our way home from the hospital. You can barely see it, but he's in pants and a hoodie. Baby hoodies. Who knew?
 Poor Mags was pretty freaked out the first few days. She's really good now, even sniffing and licking Ezra a bit. But don't let her fool you. She's just trying to steal his pacifiers.
 Nobody likes it when their face peels off! Surprisingly, you know what helps with this? Breast milk. Too much information? Sorry.
 These brothers hit it off pretty great. But Ezra still isn't sure about dog kisses. Or maybe it's the breath...'
 I shot this from bed when I had a fever the other day. Hence the strange angle.
 See how fast they grow up? Ha! I love the hat with the mustache. He looks like Mario or some other small-time crook.

 And then just a few shots from today's nap. Before he peed on me. But seriously, who could even mind. What a sweetie.
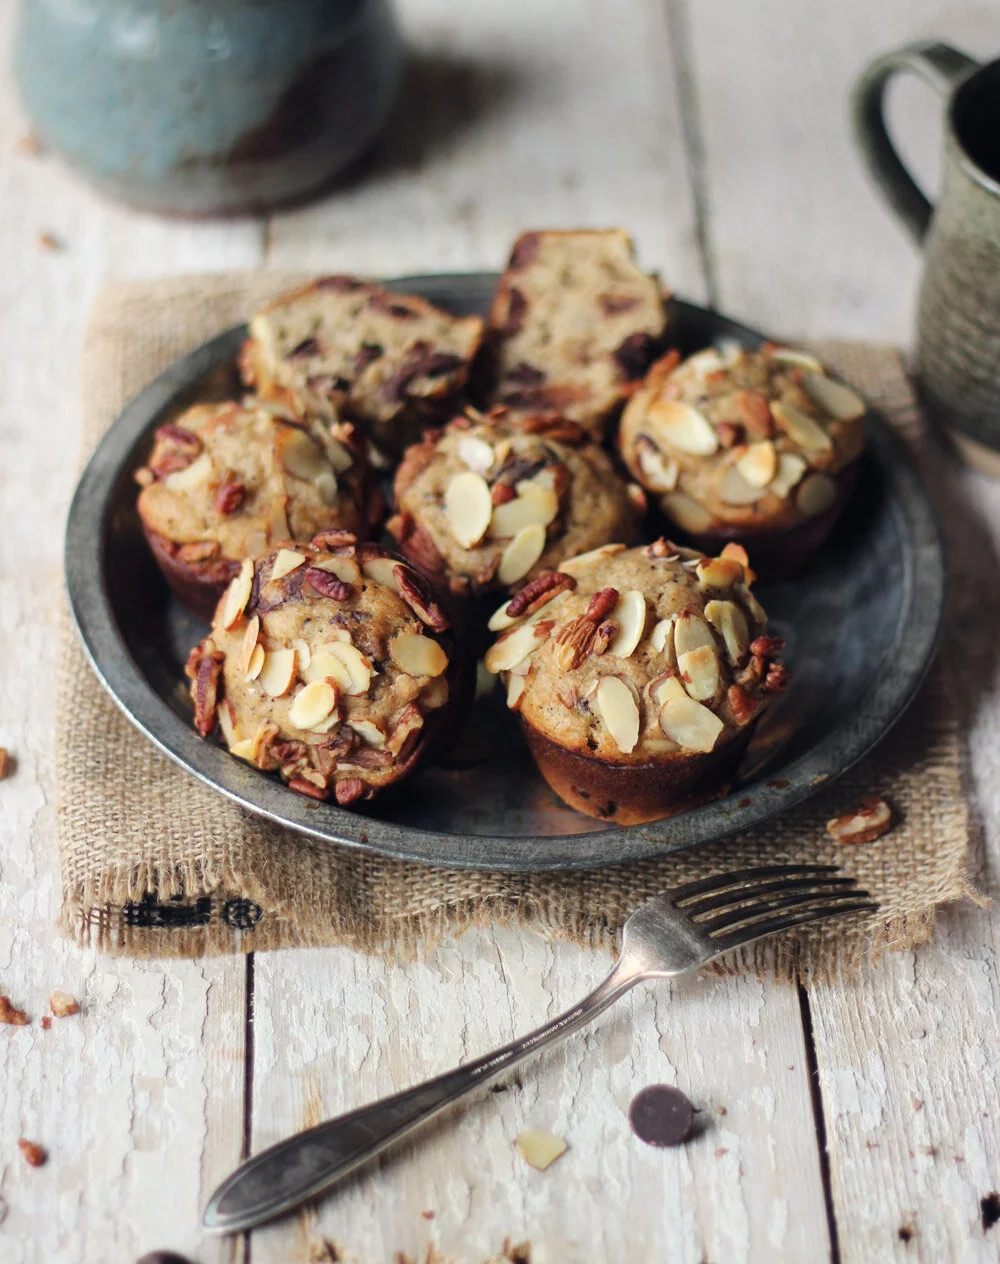

 Hi, I'm Liz from
  Here's what you'll need:
 DIRECTIONS:
 Enjoy!

 Well, hello there! Been a few days without blogging, so I'm guessing you guys figured out that our baby was born! This is Mr. Ezra Alexander, and we think he's pretty rad. Look at all that hair!So last Saturday night, I rubbed my belly and told this little guy that if he could hold off and let me see The Replacements before going into labor, then he would be allowed one free pass in high school. And we got to go to the show! And it was fabulous and wonderful and just what we needed. And an hour after we got home from the concert, my water broke.Yup. Just like that.I labored at home until 11 am the next morning (Sunday) and then we headed into the hospital. This little charmer was born at 1:30 pm on Tuesday via c-section. Yeah, go on and do that math. To say it was tough would be an understatement, but I don't want to focus on that anymore. I just want to heal up and get back to my normal self.We're at the hospital recovering a bit longer (trust me when I tell you I need it), and then we'll get back into a groove again soon. Hopefully you'll get some great photos and blog posts a bit more regularly now, but please only count on once or twice a week until I am all healed up.

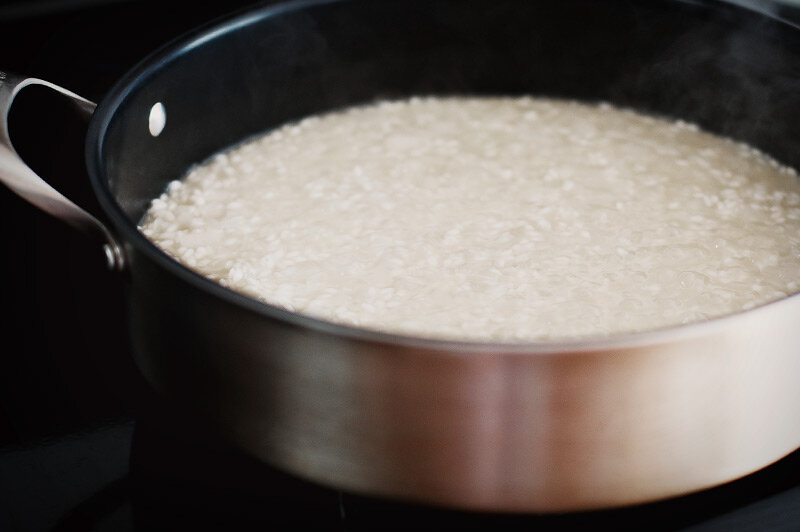

 I'm honored to be guest posting again for Leslie, who has her hands full for all the best reasons.She invited me to do this post months ago, wisely, but it was only last week (!!!) that I decided what to make. Indecision!Over dinner one week ago: complaining to my boyfriend that I still hadn't thought of a post-worthy dish, all while he shoved monster-sized bites of my homemade risotto into his face. His eyes rolled back into his head as I taaaaaalked and whimpered over the sounds of his mmms and aaahs. Yeah, so ridiculous. Obviously I should make risotto!
 We're doing 2 kinds of risotto today because, did you know you can bake risotto? I know, that one simple word rocked my world too. It's a fantastic method because you can prepare a monster, one-pot batch in your dutch oven without any fuss, not a single one, and have leftovers for a week. This is why we're doing 2 risottos today: breakfast + dinner.Risotto for all the meals!
 Bacon, Egg, and Leek Breakfast Risotto (BAKED!)
 *Wine is optional, but I'll confess to a secret pleasure of an open bottle in the kitchen before 10 a.m.**Leftovers for a week, I'm not kidding. I caught my boyfriend sneaking pizza last night because he needed a break!
 Classic Parmesan Risotto
 Bring chicken broth to a boil in a saucepan; reduce to a simmer.Heat oil over medium in a wide saute pan (
 One last thing... Mixtapes!I am also serving up 2 mixtapes to accompany your A.M. and P.M. risotto dishes because music, especially free music, lights up my day. Just a little something extra to brighten your breakfast, with coffee and perhaps a newborn, or evening meal with friends.